

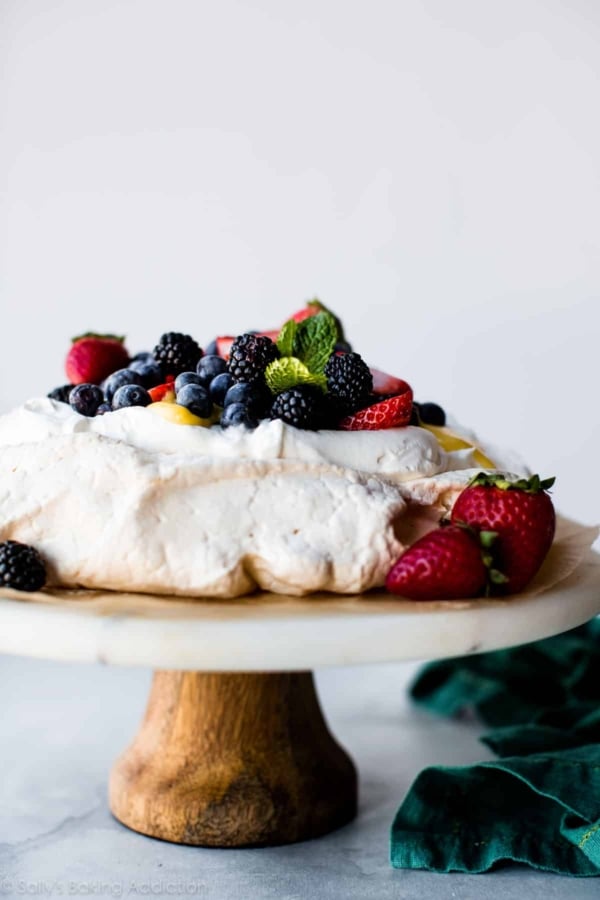
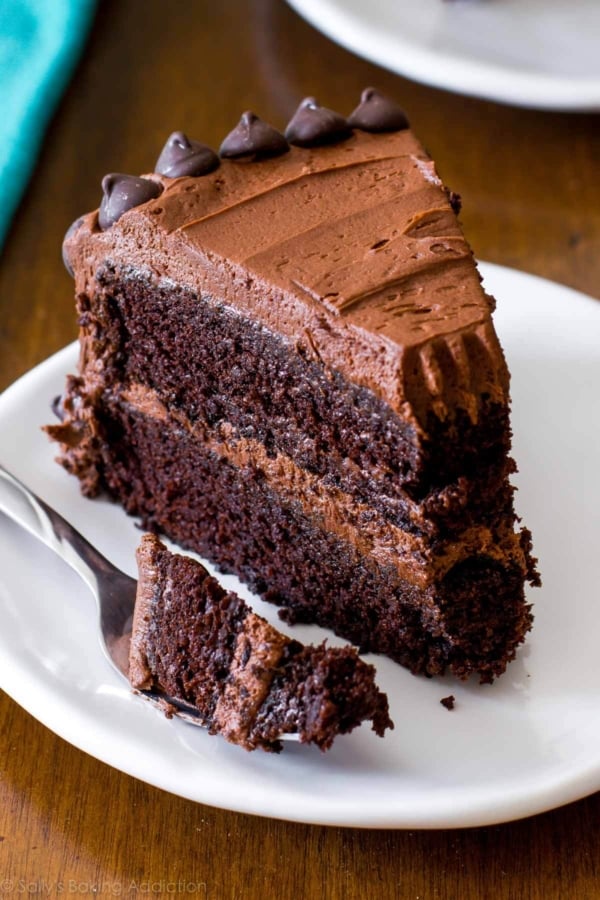
Light as air, delicately crisp on the outside, and soft and marshmallowy within, this homemade meringue roulade is a show-stopping dessert worthy of a special occasion. It’s naturally gluten free, endlessly customizable, and tastes even better than it looks.
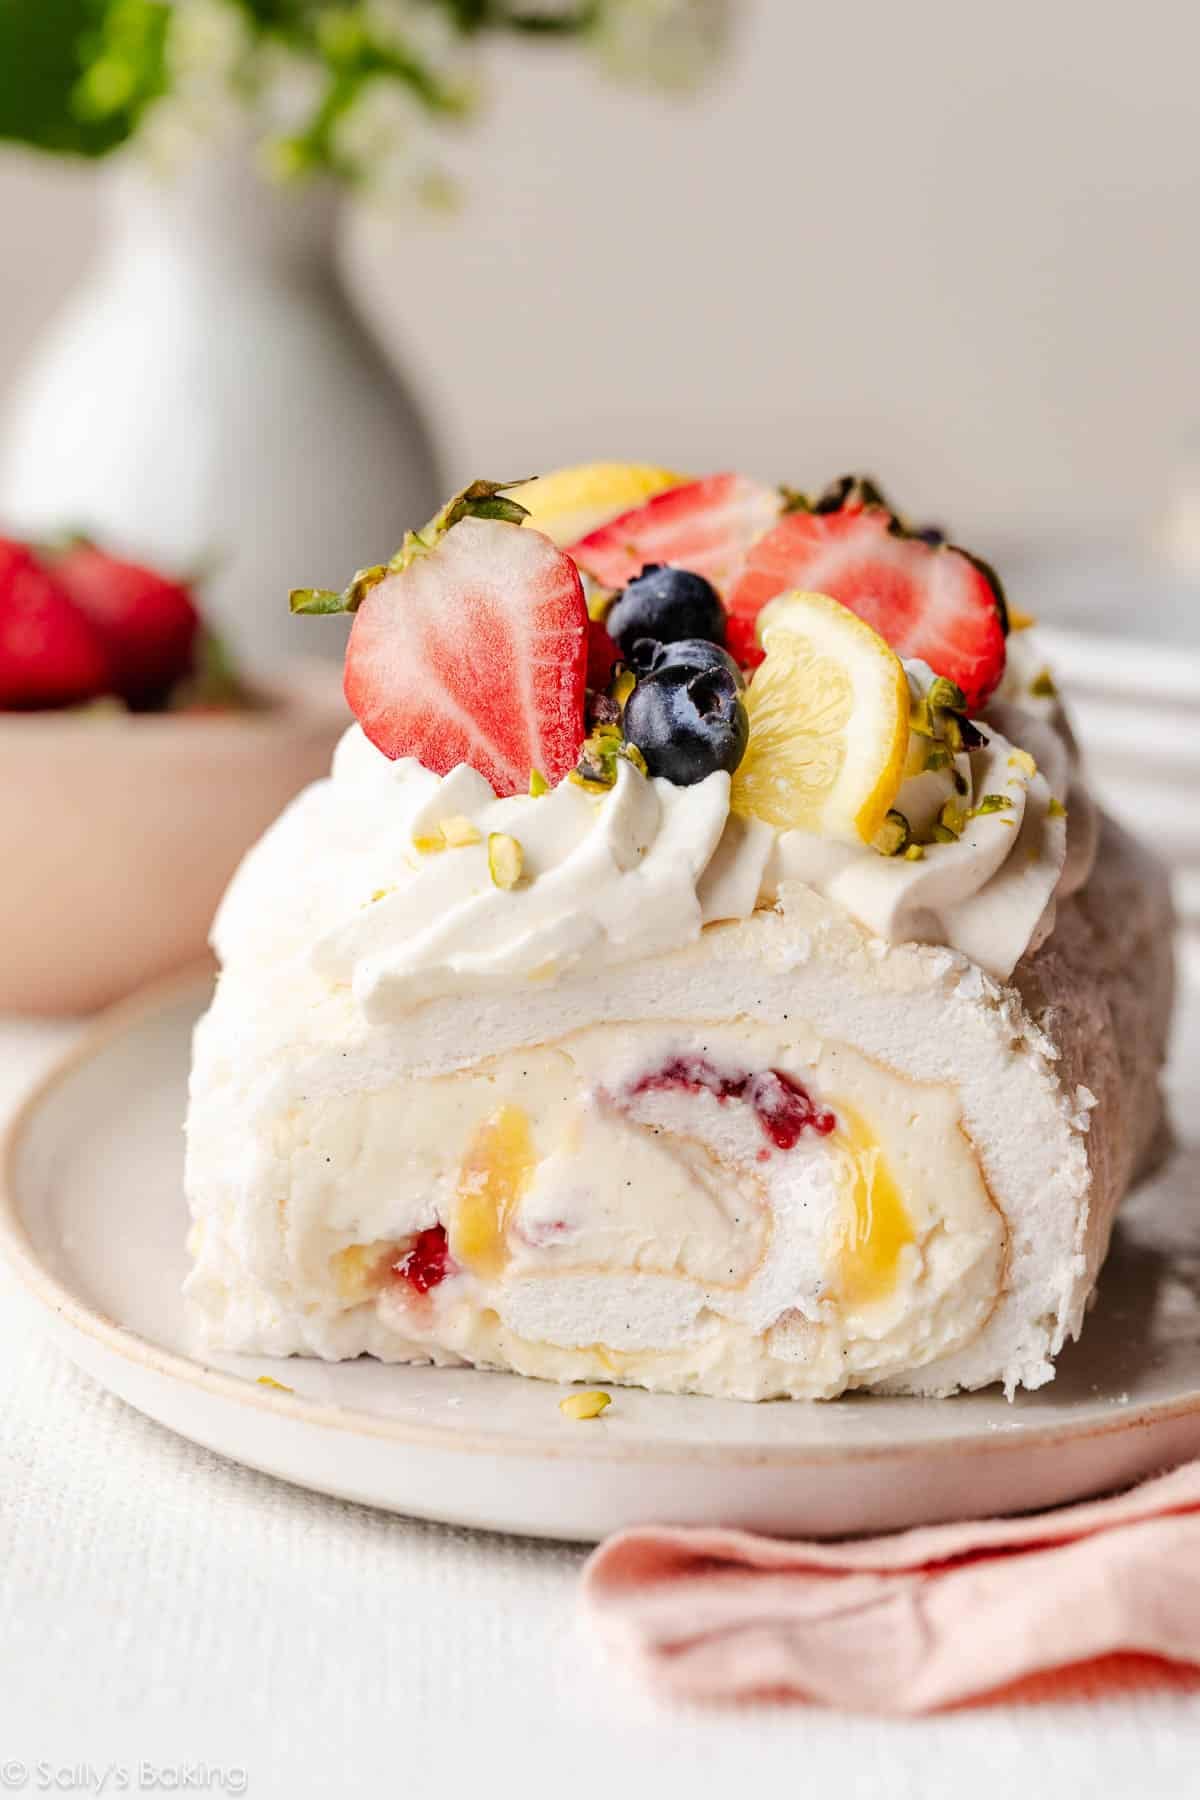
Think of this meringue roulade as pavlova‘s soft, flexible cousin—the kind you can roll up with clouds of cream filling, tangy lemon curd, or your favorite jam. The texture is what makes this dessert unforgettable: delicately crisp on the outside, soft and marshmallowy inside, and melt-in-your-mouth creamy.
I’ll walk you through every step, including all my best tips for preventing cracks and getting that beautiful swirl, so you can feel confident in giving it a try.
Why You’ll Love This Meringue Roulade
- Light and airy, not overly sweet
- Endless filling and topping variations
- A naturally gluten-free recipe
- A challenging recipe worthy of your baking bucket list. It’s been on mine for a long time!
One reader, Kalani, commented: “I was so excited to make this for Easter! As instructed, I read all the way to the end and followed the directions exactly. It was SO good and such a beautiful dessert. It was light and lovely. I also made the lemon curd as suggested, and those were our favorite bites! ★★★★★“
Another reader, Jordan, commented: “This is a slightly challenging yet rewarding recipe! Definitely something different that will surprise guests and so customizable as well! Some skill involved, but Sally’s instructions are so helpful and specific, it’s hard to go wrong! ★★★★★“
Another reader, Amy, commented: “I never thought I could make such an elegant dessert. It was time consuming but so worth it. It looked good and tasted great! Made my own lemon curd, too! Next time I will try a mocha filling. Thanks for another great recipe and for making me go out of my comfort zone! ★★★★★”
A meringue roulade is one of those desserts that looks effortlessly elegant, but in reality, it requires precision, patience, and a careful hand. From properly whipped egg whites to perfectly judged bake time and a confident (but gentle) roll, every stage matters.
But that’s exactly what makes it so rewarding. Just like when making French macarons, if you take the time to thoroughly read through all the instructions and success tips before you begin, you’ll be rewarded with a meringue roulade with a delicately crisp exterior, a soft, marshmallow-like interior, and a beautiful spiral of cream and fruit.
Let’s walk through it thoroughly so you can approach it with confidence… and realistic expectations!
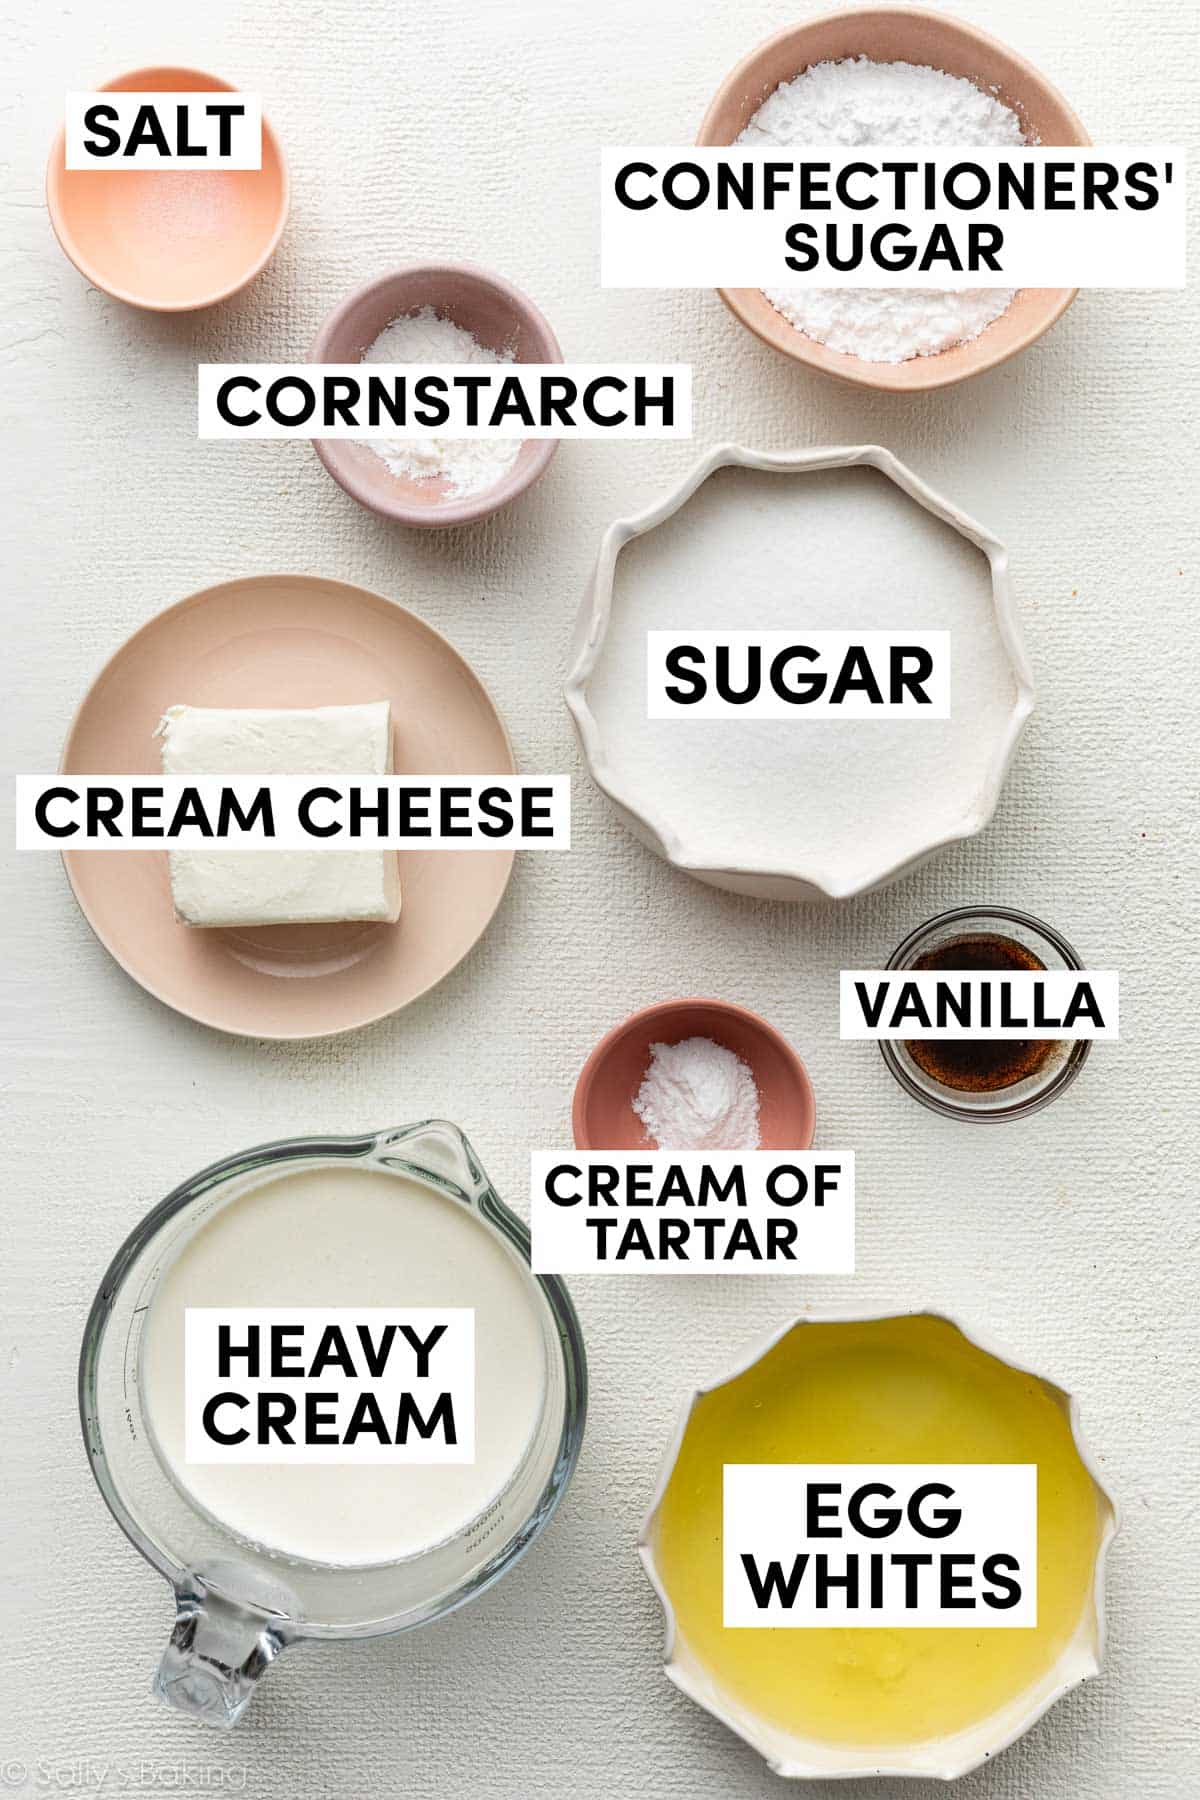
Ingredients You Need for Meringue Roll & Why
Meringue relies on just a handful of ingredients, so each one has an important job to do:
- Egg Whites: Use room-temperature eggs for maximum whipped volume. Tip: Separating eggs is easier to do when the eggs are cold (less chance of the yolks breaking), so separate them right after taking them out of the refrigerator, and then let the whites come to room temperature before using in the recipe.
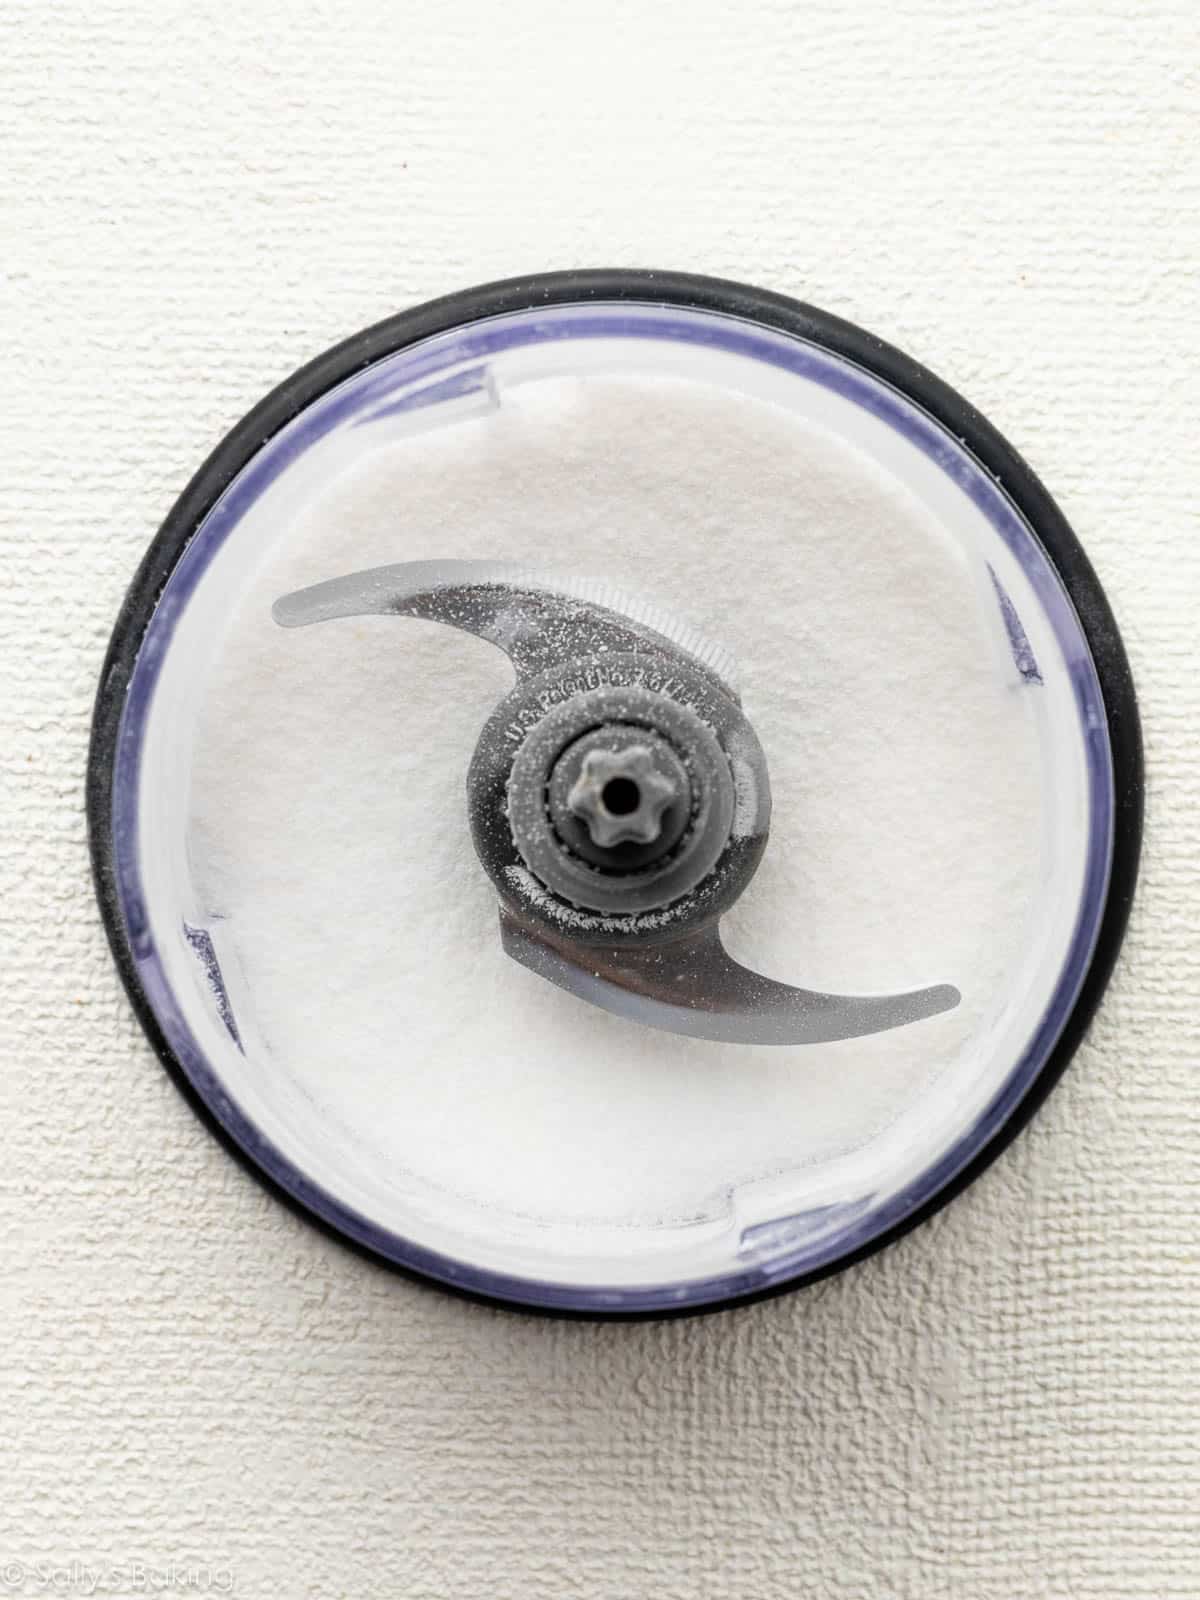
- Sugar: Stabilizes and sweetens the meringue. You need superfine sugar, which is quick to make from granulated sugar. Simply pulse it in a food processor to break the crystals down finely. This is crucial for ensuring the sugar will fully dissolve in the meringue.
- Cream of Tartar: You need an acid to help the egg whites hold onto air and, like the sugar, prevent the egg whites from collapsing. If you don’t have cream of tartar, you can substitute white vinegar instead (you won’t be able to taste it).
- Cornstarch: Keeps the inside soft and marshmallowy. While corn is naturally gluten free, some brands may be processed on shared equipment with wheat, so checking for a “gluten-free” label is best practice if you need this dessert to be gluten free.
- Vanilla & Salt: Both for flavor.

Before You Begin: Read This First
If you’re new to meringue, expect a learning curve. My team and I had many meringue roulade fails along the way. Don’t get discouraged, and don’t throw out your hard work. Never underestimate the power of garnishes like whipped cream, white chocolate shavings, or fresh fruit to camouflage cracks. It will still taste incredible. 😉
This is not a “set it and forget it” recipe.
Here are the critical factors:
- Humidity matters: Moist air can prevent proper crisping
- Mixing precision is key: Under- or over-whipped egg whites will fail
- Bake time is nuanced: Even 2–3 extra minutes can make rolling difficult
- Timing the roll is crucial: Too hot = fragile; too cool = cracking
The goal is a meringue that is:
- Firm and glossy before baking
- Lightly crisp on the outside
- Soft and flexible inside (so it rolls)
Step by Step: How to Make a Meringue Roulade
Unless you happen to have superfine or caster sugar on hand, the first step is to pulse granulated sugar in a food processor to reduce the size of the sugar crystals:
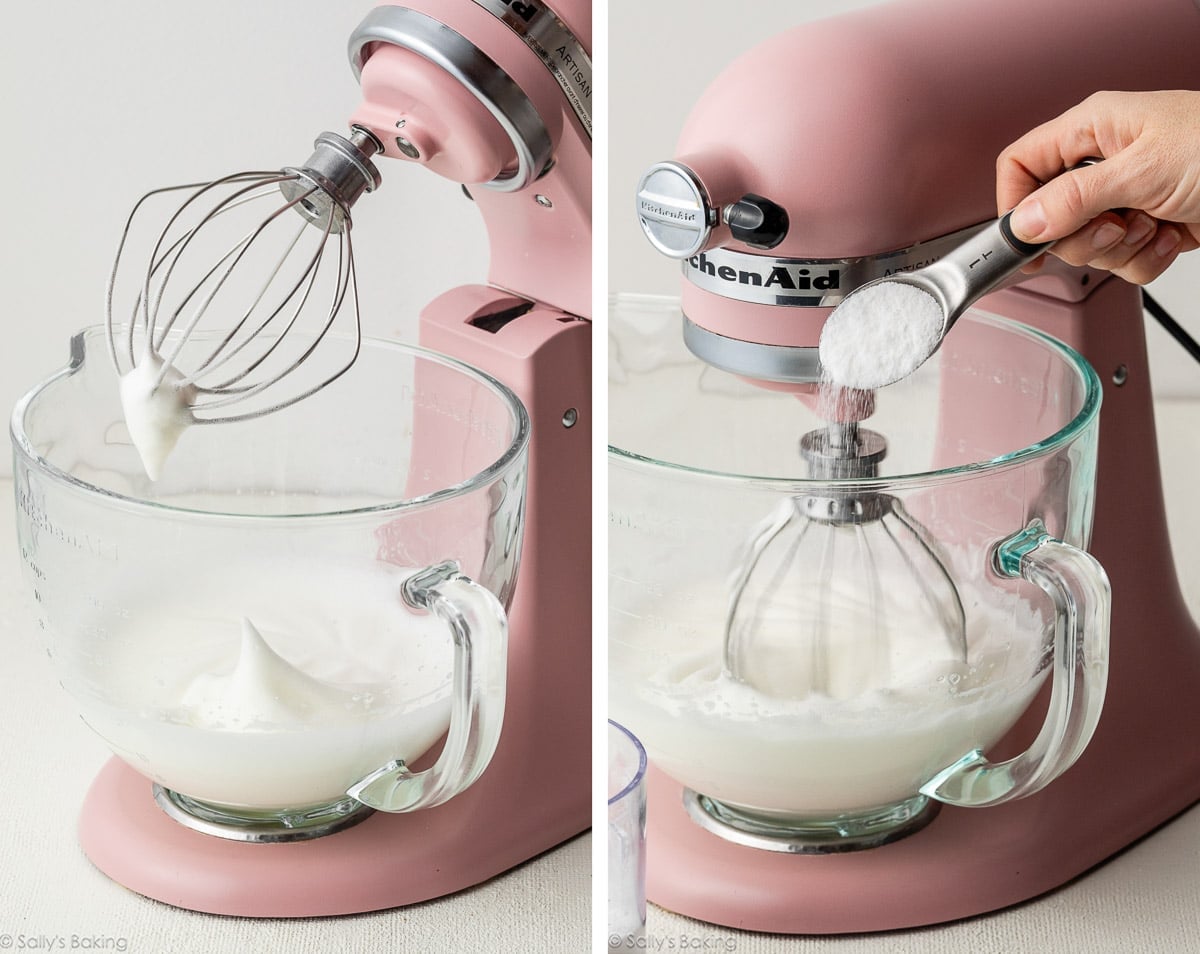
Then go ahead and start whipping the egg whites. Once they’re foamy and have increased in volume, add the cream of tartar, then begin adding the sugar, a Tablespoon at a time, with the mixer running.
- Why add sugar gradually? If you add the sugar all at once or too quickly, it would result in a dense, unstable meringue.
Whip until the meringue is glossy and holds stiff peaks. If you stop the mixer and lift up the whisk attachment, the peak shouldn’t move or fall off the attachment.
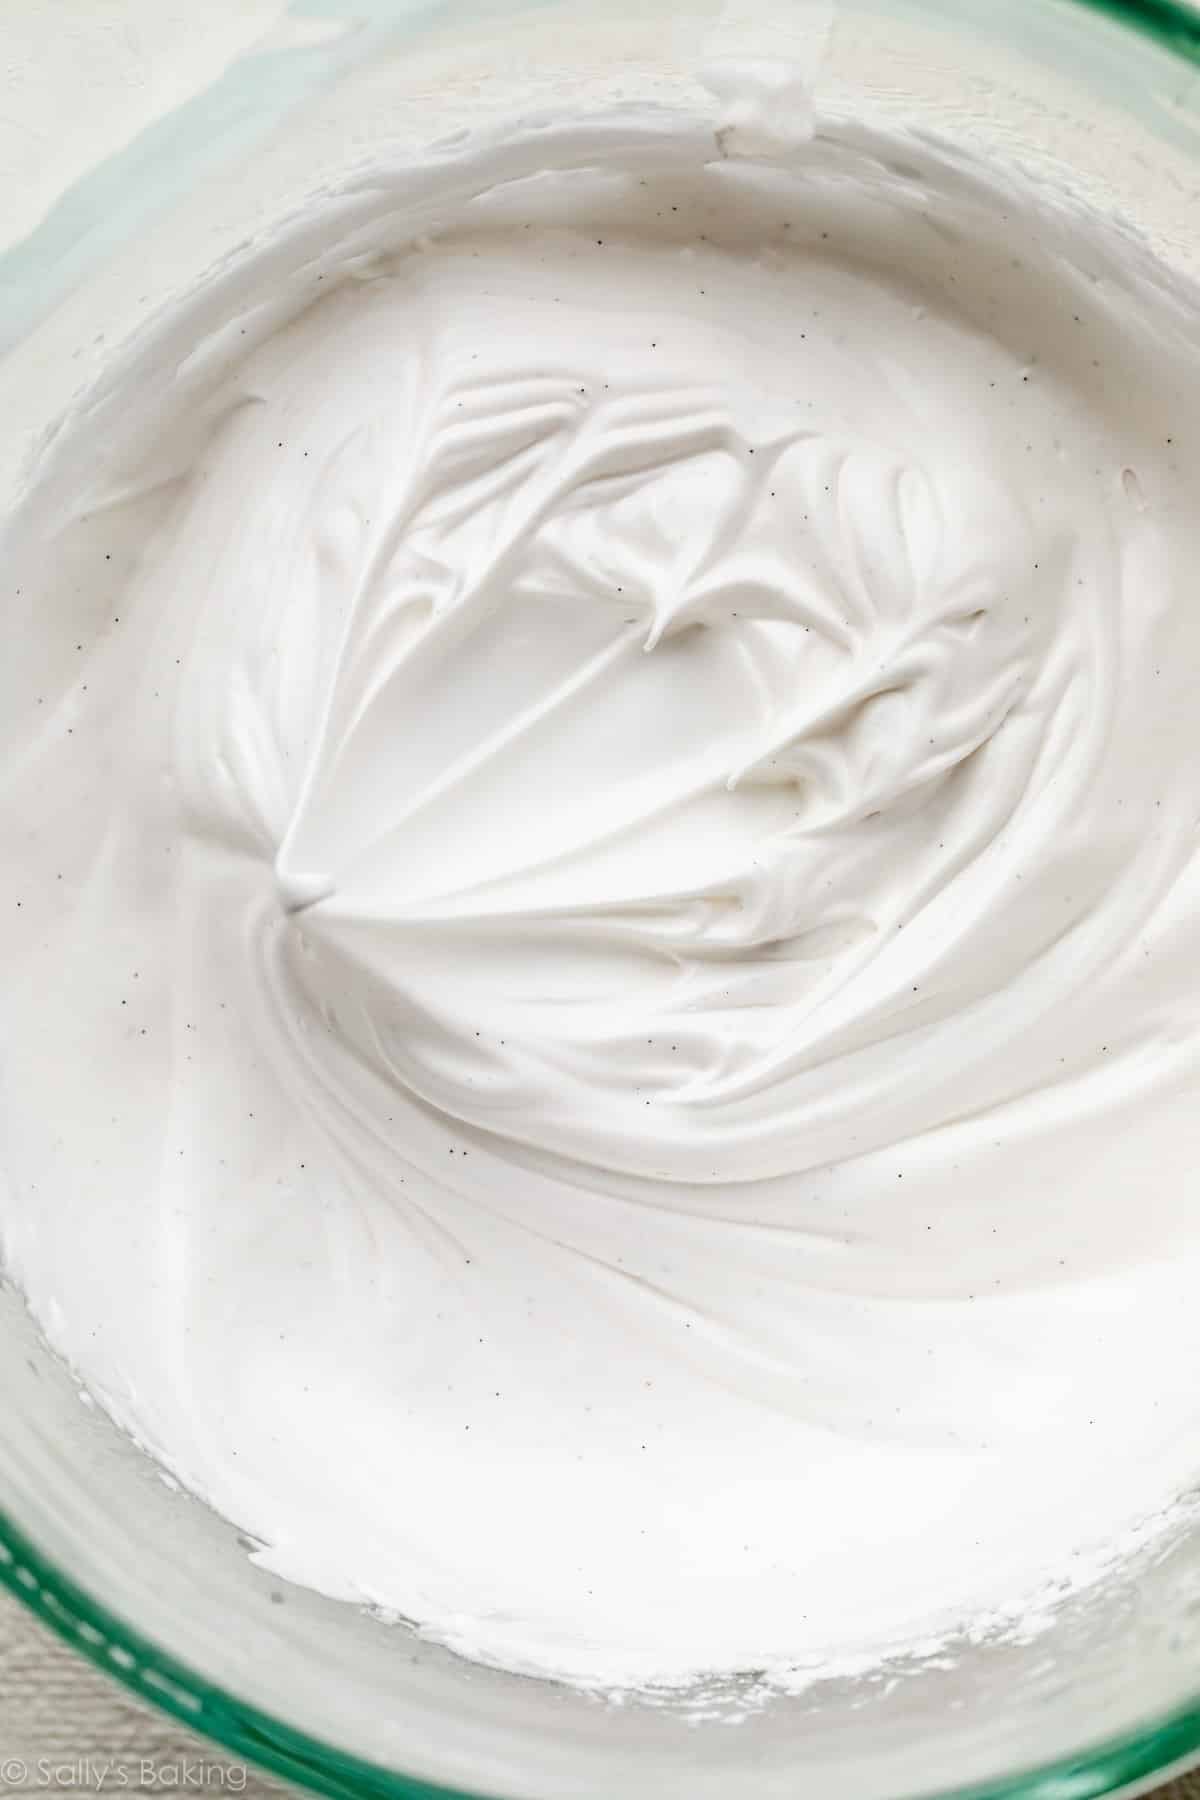
Mix in the remaining meringue ingredients. Now it’s ready to be spread in the pan, and I have some helpful tips for this step.
Prep the Pan
Here’s my team’s favorite trick: Use a little of the meringue as the “glue” to secure the parchment paper to the pan. Dab a bit of meringue in each corner of the pan, then press the parchment into place so it sticks. This makes spreading the meringue into the lined pan SO much easier, trust me!!!
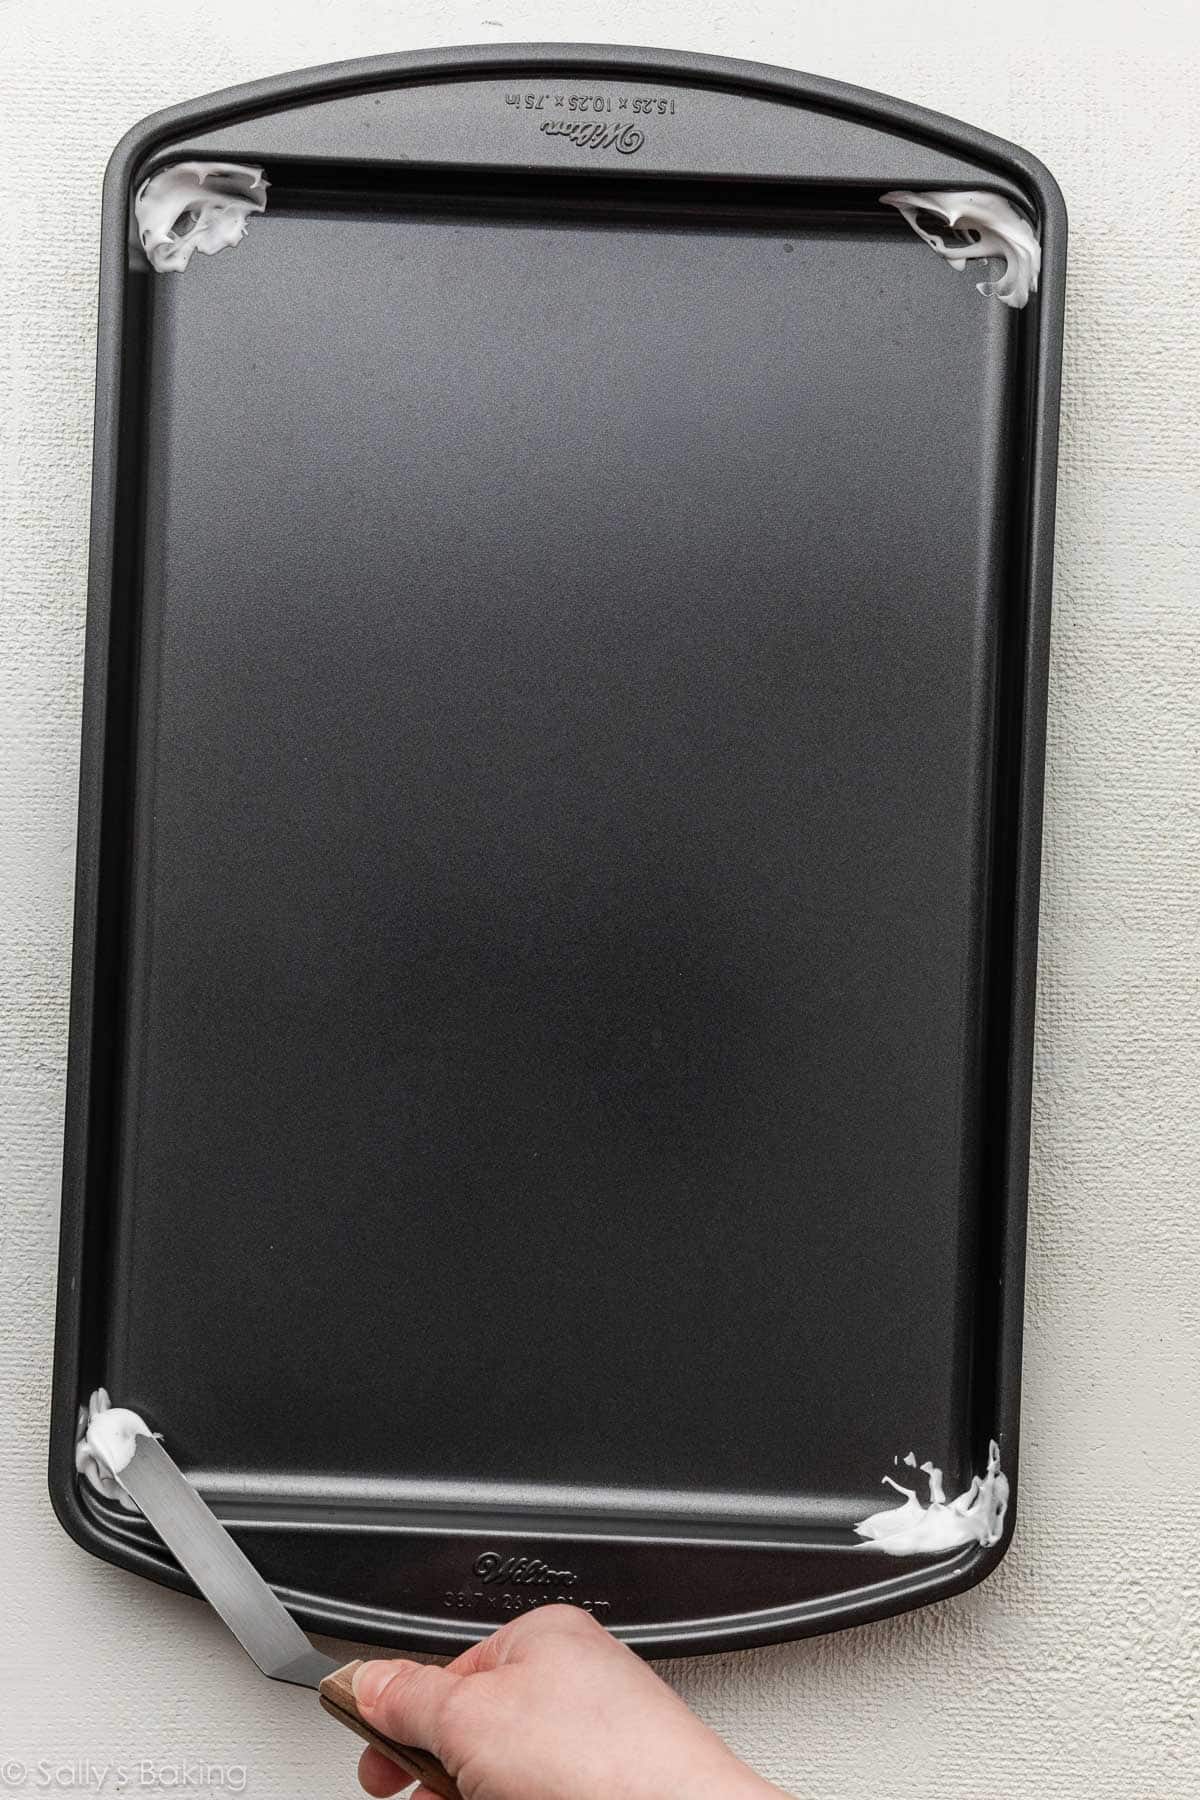
And one more detail: Sprinkle a little bit of granulated sugar very lightly over the parchment paper before you spread the meringue into the pan. This helps prevent it from sticking to the parchment.
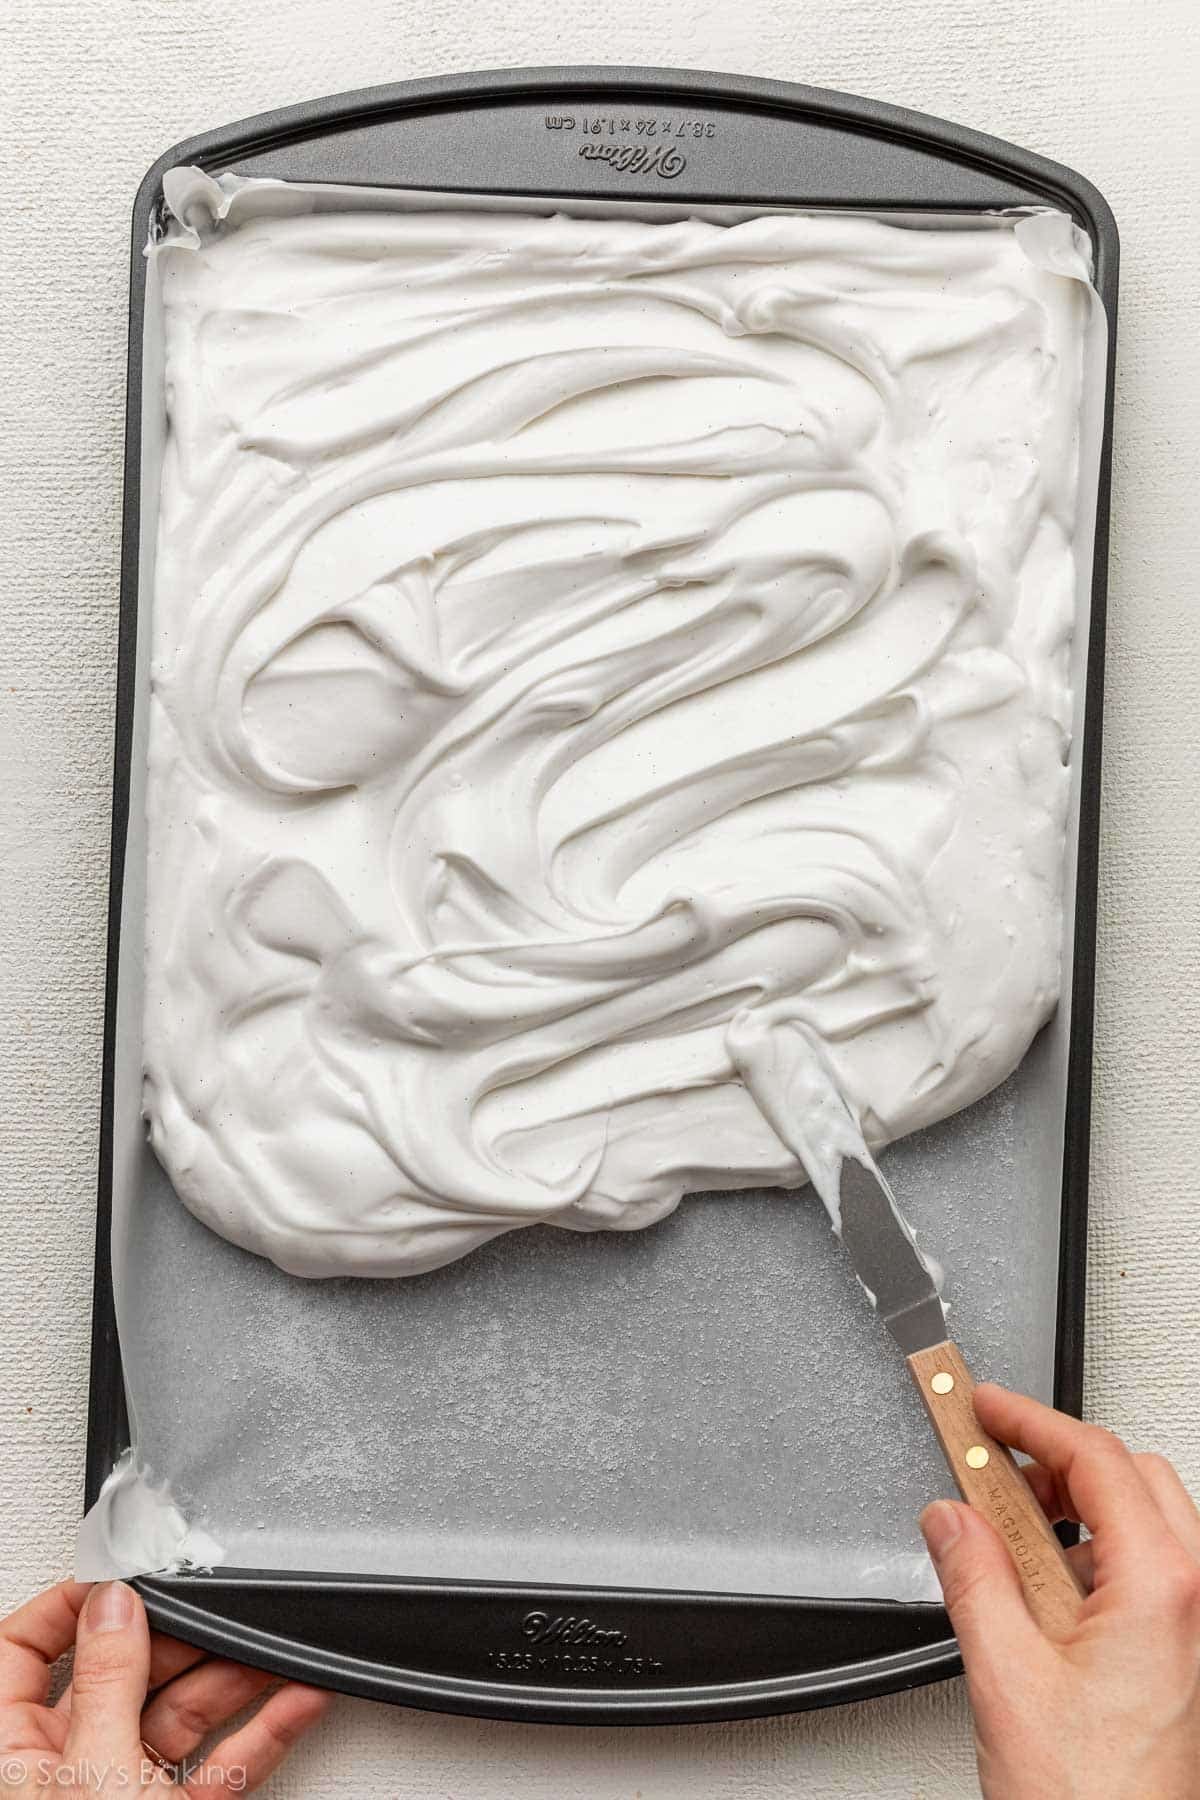
Then spread the meringue evenly to the edges of the pan. A small offset spatula is the best tool for spreading this meringue. Sprinkle a bit more sugar over the top before baking.
- Why? The dusting of sugar on top melts when it hits the oven, then recrystallizes as the meringue bakes. The result is a crisp exterior, which is a wonderful contrast to the soft, marshmallowy center inside your roulade.
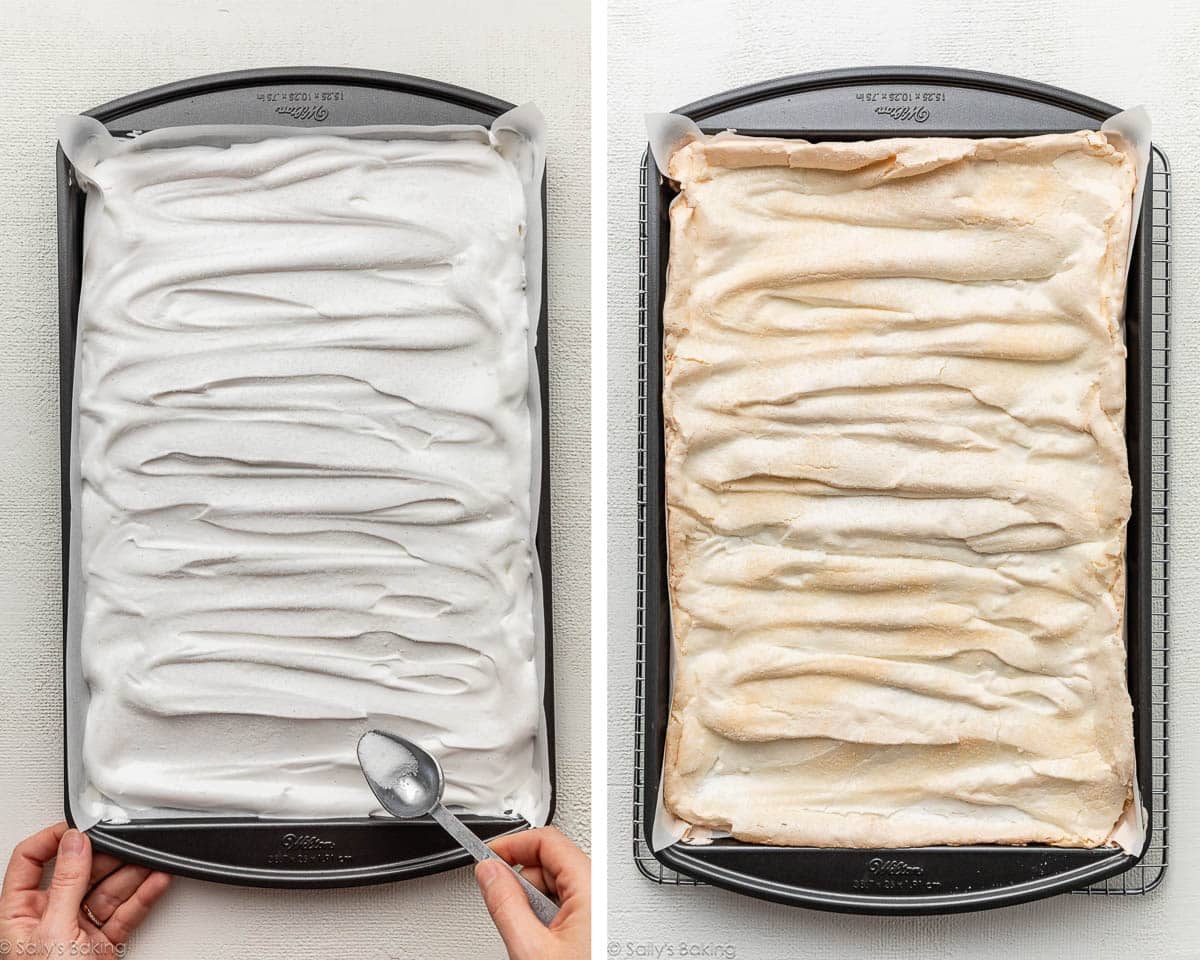
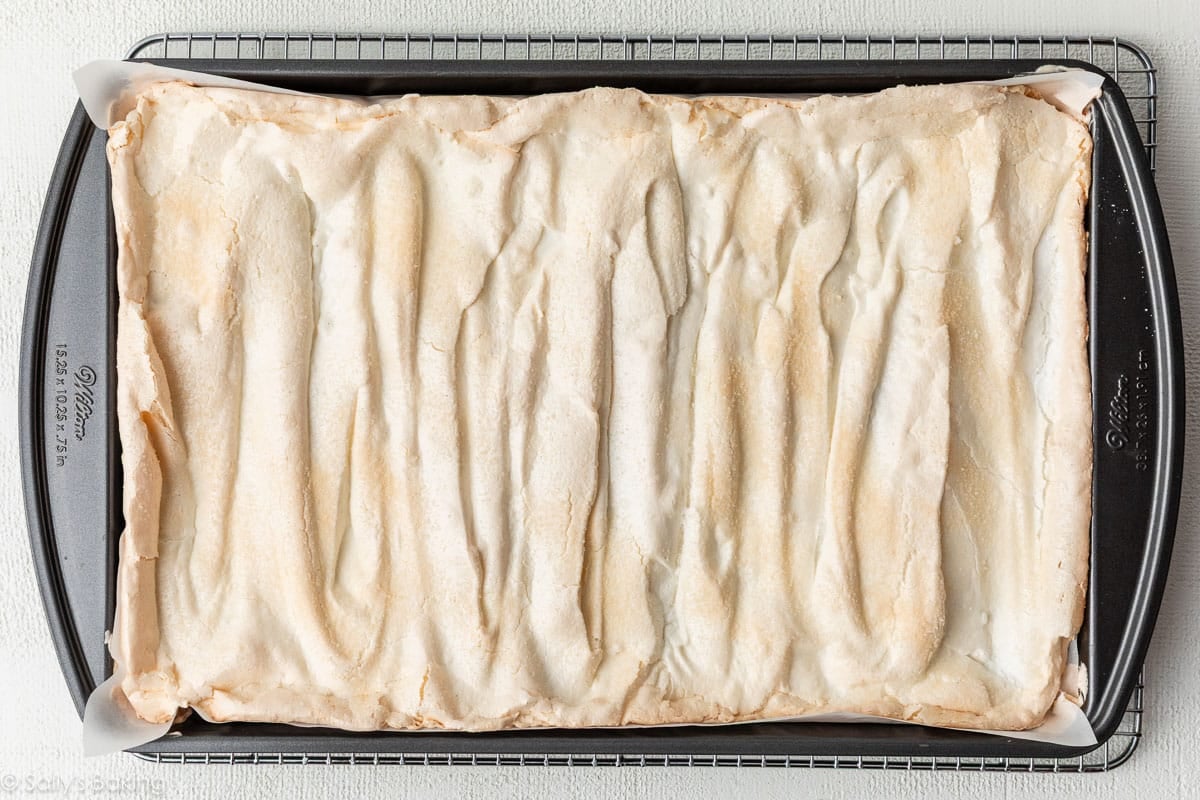
The meringue will puff up in the oven. The top should be just set (not wet or tacky) and if you touch it gently with your finger, it should feel lightly crisp on the surface, but springy beneath. Visually, it should still be pale in color, and just barely golden on top.
Here’s What We Learned When Rolling the Meringue
Like with any cake roll, such as this chocolate cake roll, rolling the meringue first without the filling is key for “training” the structure. Does that make sense?
Be sure the meringue is still warm for this step. If you let it cool for too long, it will crack. In our testing, we found just 10 minutes of cooling is the sweet spot, so set a timer once the meringue comes out of the oven. During this time, prepare for rolling:
Place a clean kitchen towel on the counter, then place a piece of parchment on top, aligning one of the short ends with the bottom end of the towel. Dust a little confectioners’ sugar over the top of the parchment.
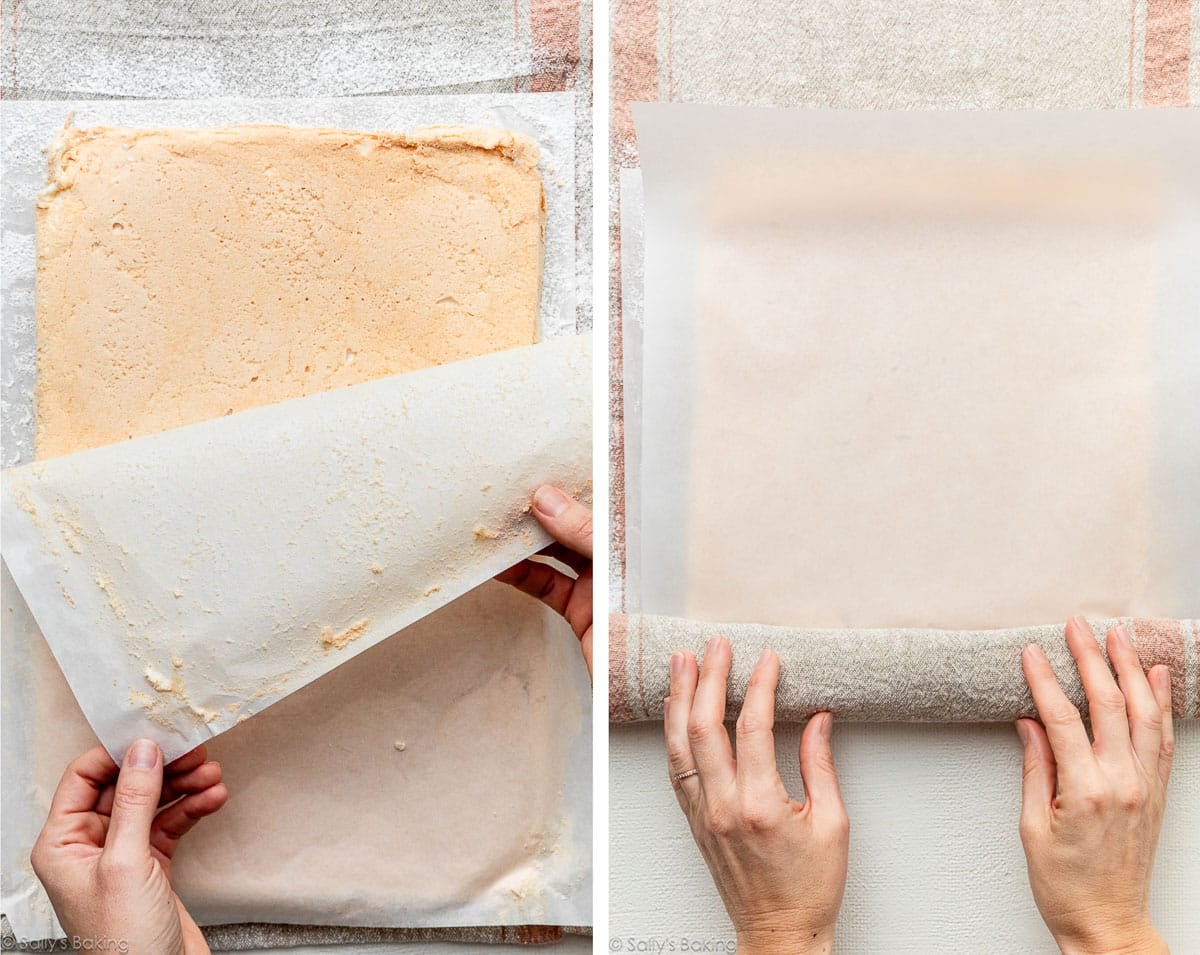
After 10 minutes of cooling, loosen the corners of the parchment from the pan, and carefully invert the meringue onto the prepared parchment/towel.
Slowly peel off the bottom parchment that baked under the meringue. Dust the meringue with a little more confectioners’ sugar, then place a fresh sheet of parchment on top.
Starting at the bottom, begin gently rolling the meringue up with the parchment and the towel. Tips for the first roll:
- Roll gently but confidently.
- Don’t compress too tightly.
- Let it cool completely in this shape (about an hour).
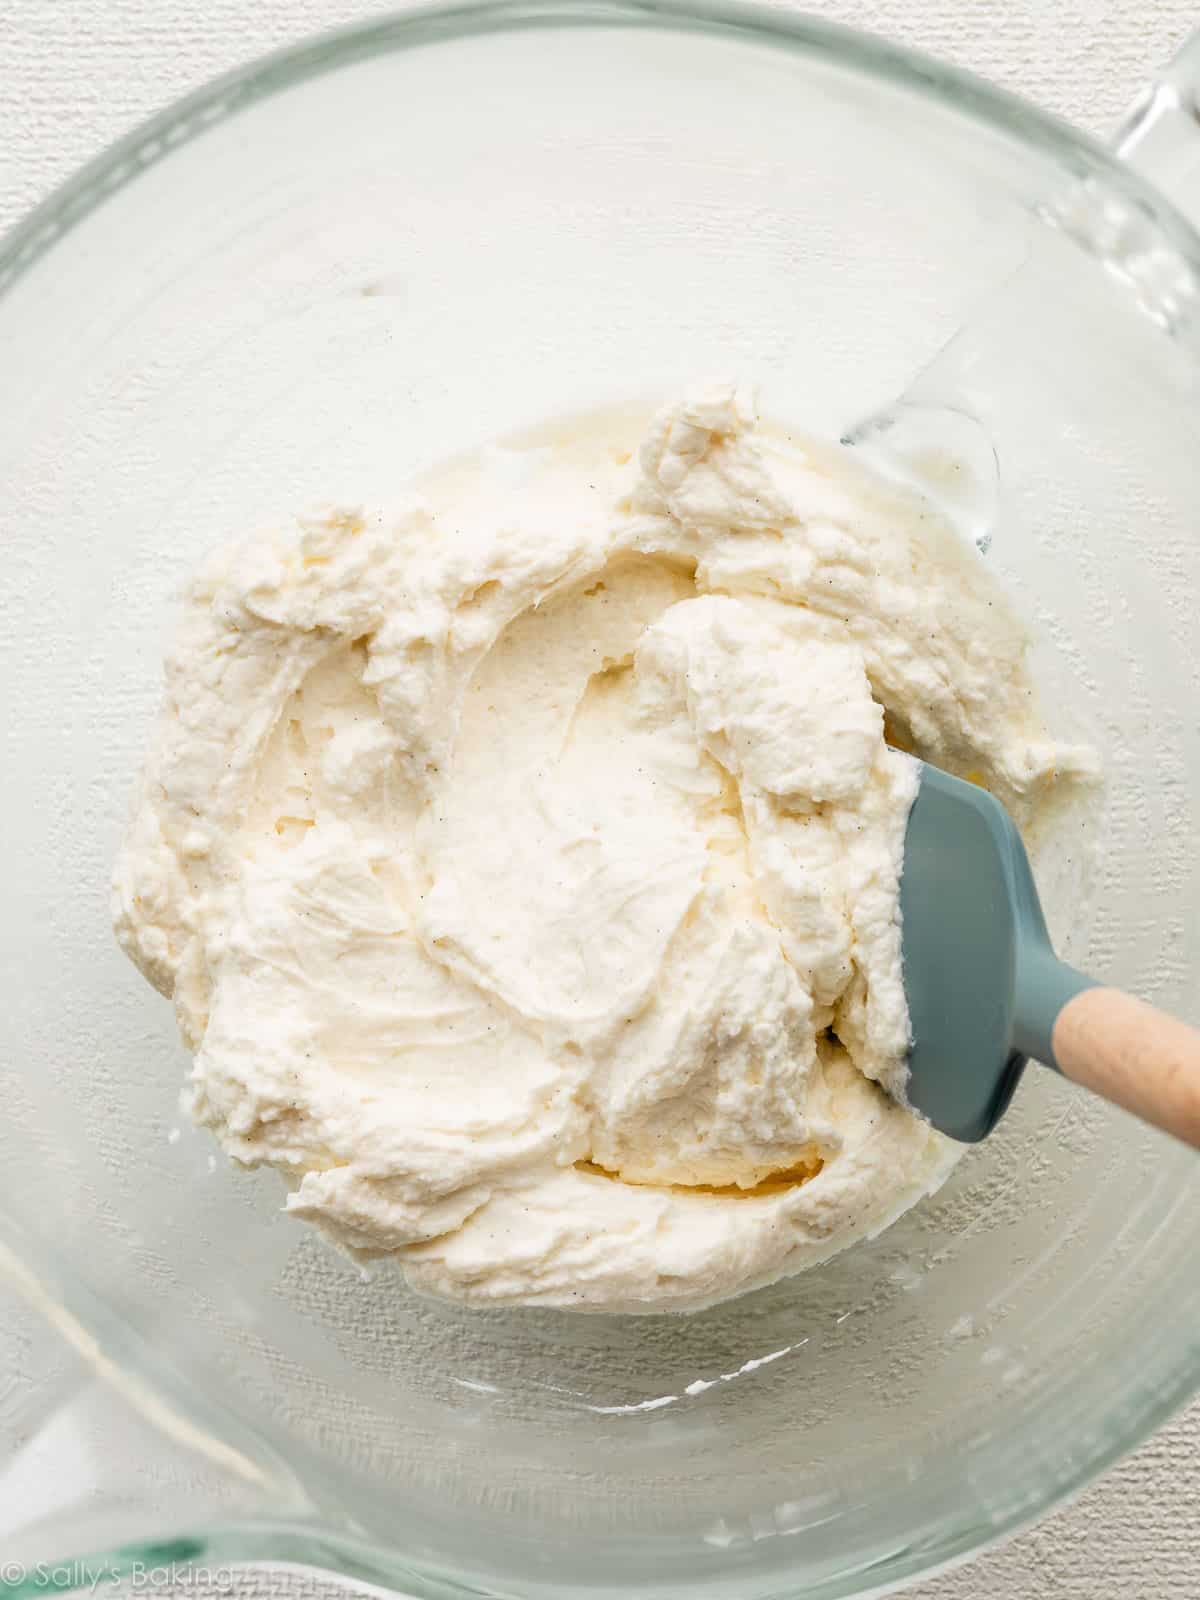
Make the Cream Filling
The cream filling we’re using in this meringue roulade is a slightly thicker, more stable version of regular homemade whipped cream. We’re using cream cheese here, but you could also use mascarpone instead if you’d prefer, like we use for the filling of this fruit tart.
Whip cream, sugar, and vanilla into soft peaks; then, beat cream cheese until smooth; and finally, mix it all together:
Unroll the cooled meringue gently.
***Some cracking is expected!*** But if your meringue roll falls apart in pieces, it was likely over-baked, or else cooled for too long before rolling. All is not lost—you can try to piece it together and spread the filling on top.
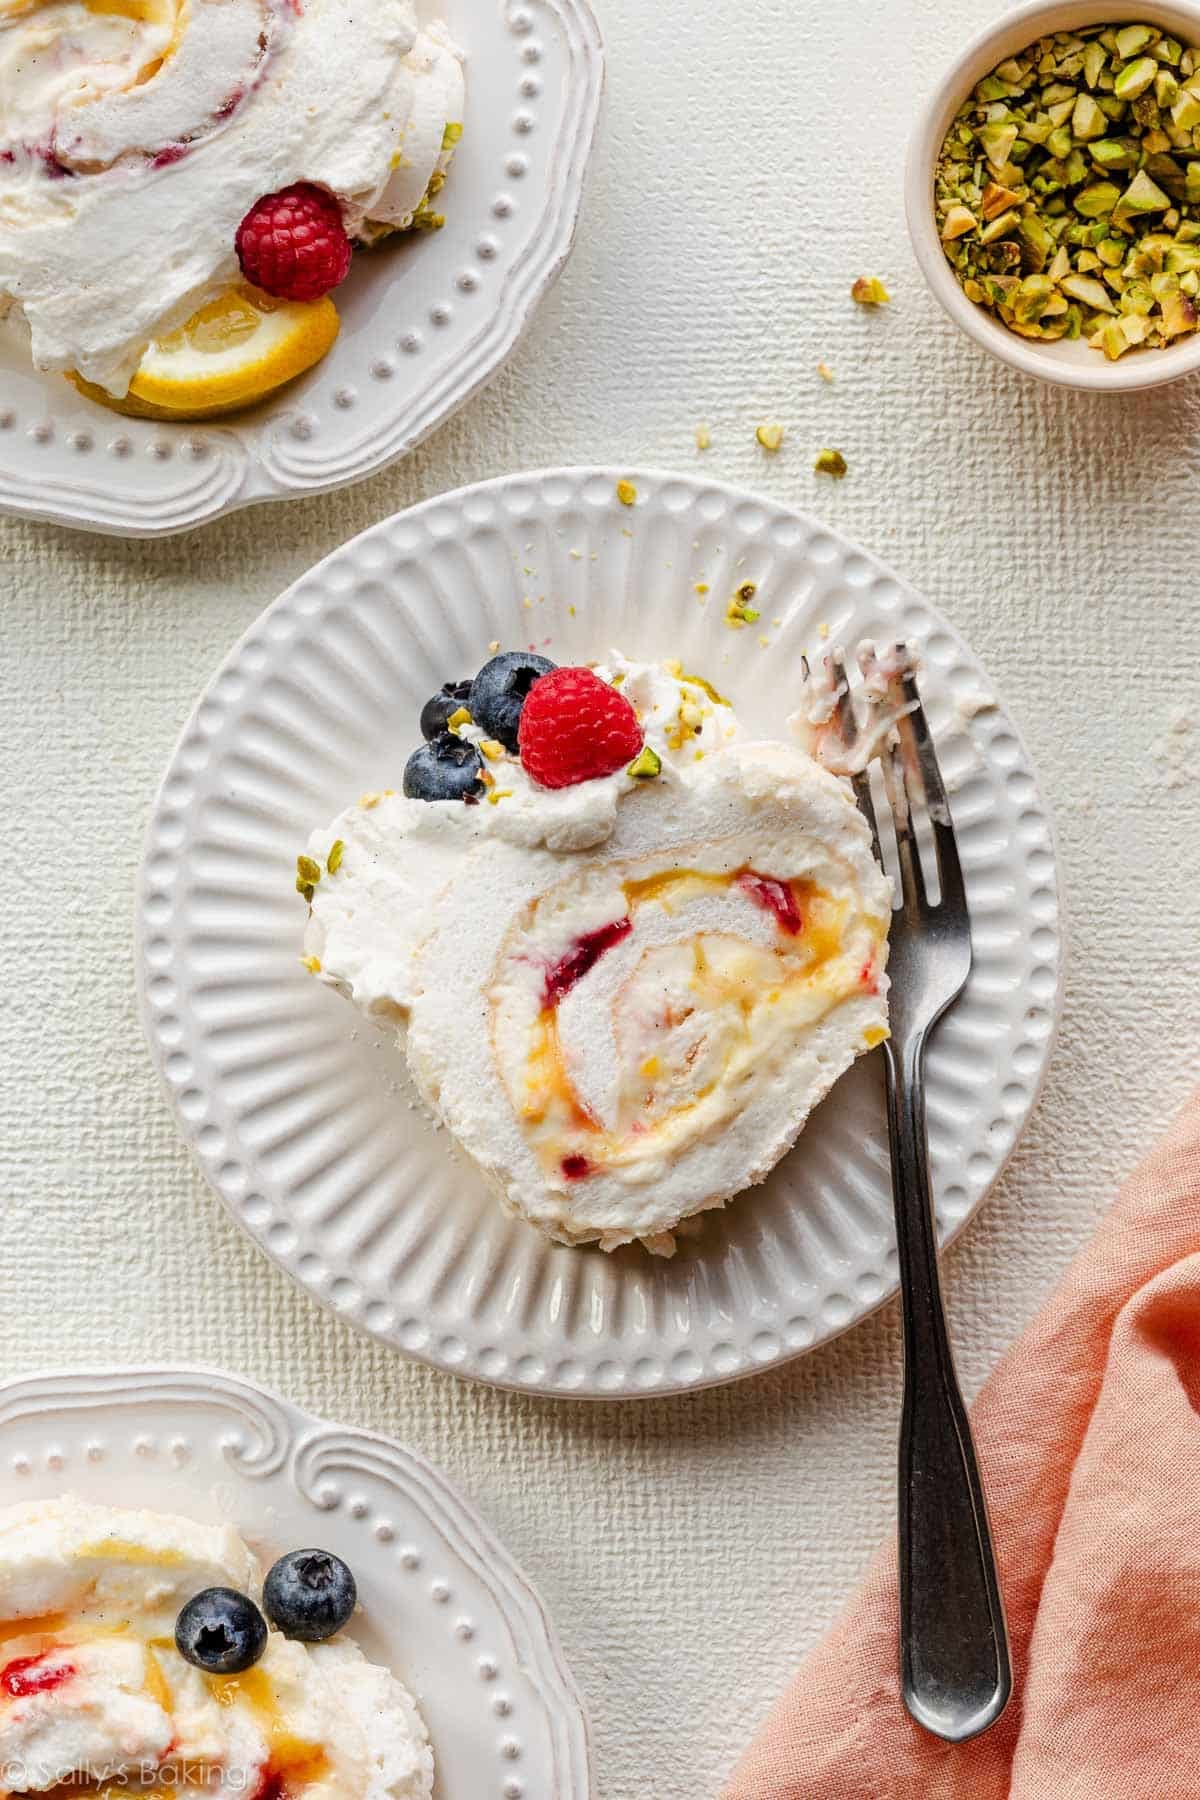
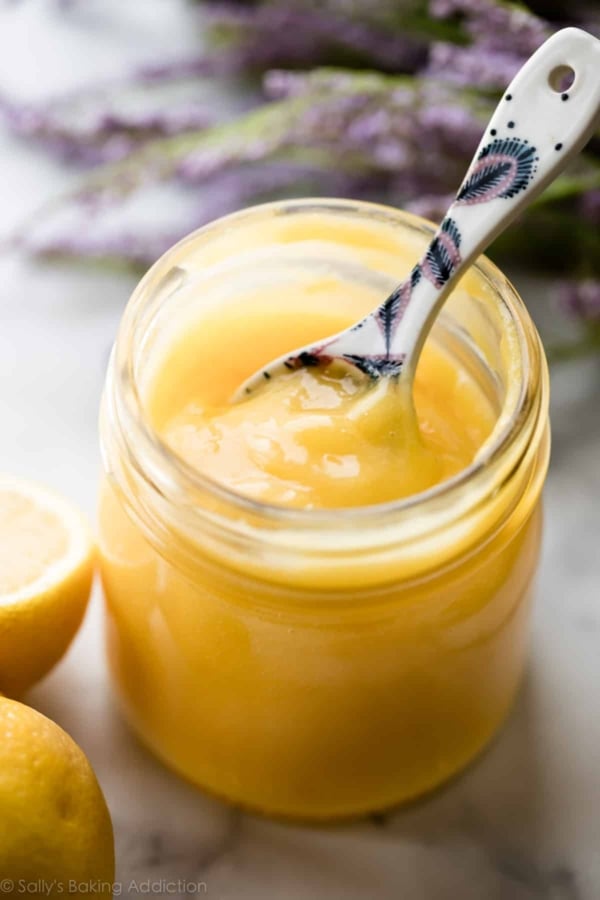
Spread the cream filling evenly over the unrolled meringue. If you’d like to add some extra flavor here, dollop some spoonfuls of lemon curd and/or raspberry jam (or your preferred flavors!) over the top.


Final Roll
Roll it back up without the towel and parchment, using the bottom piece of parchment to help guide you. Tips for the second roll:
- Move slowly and evenly.
- Lift up the bottom piece of parchment to help ease the roll over onto itself.
- Accept minor cracks—they’re part of the meringue roulade’s rustic charm!
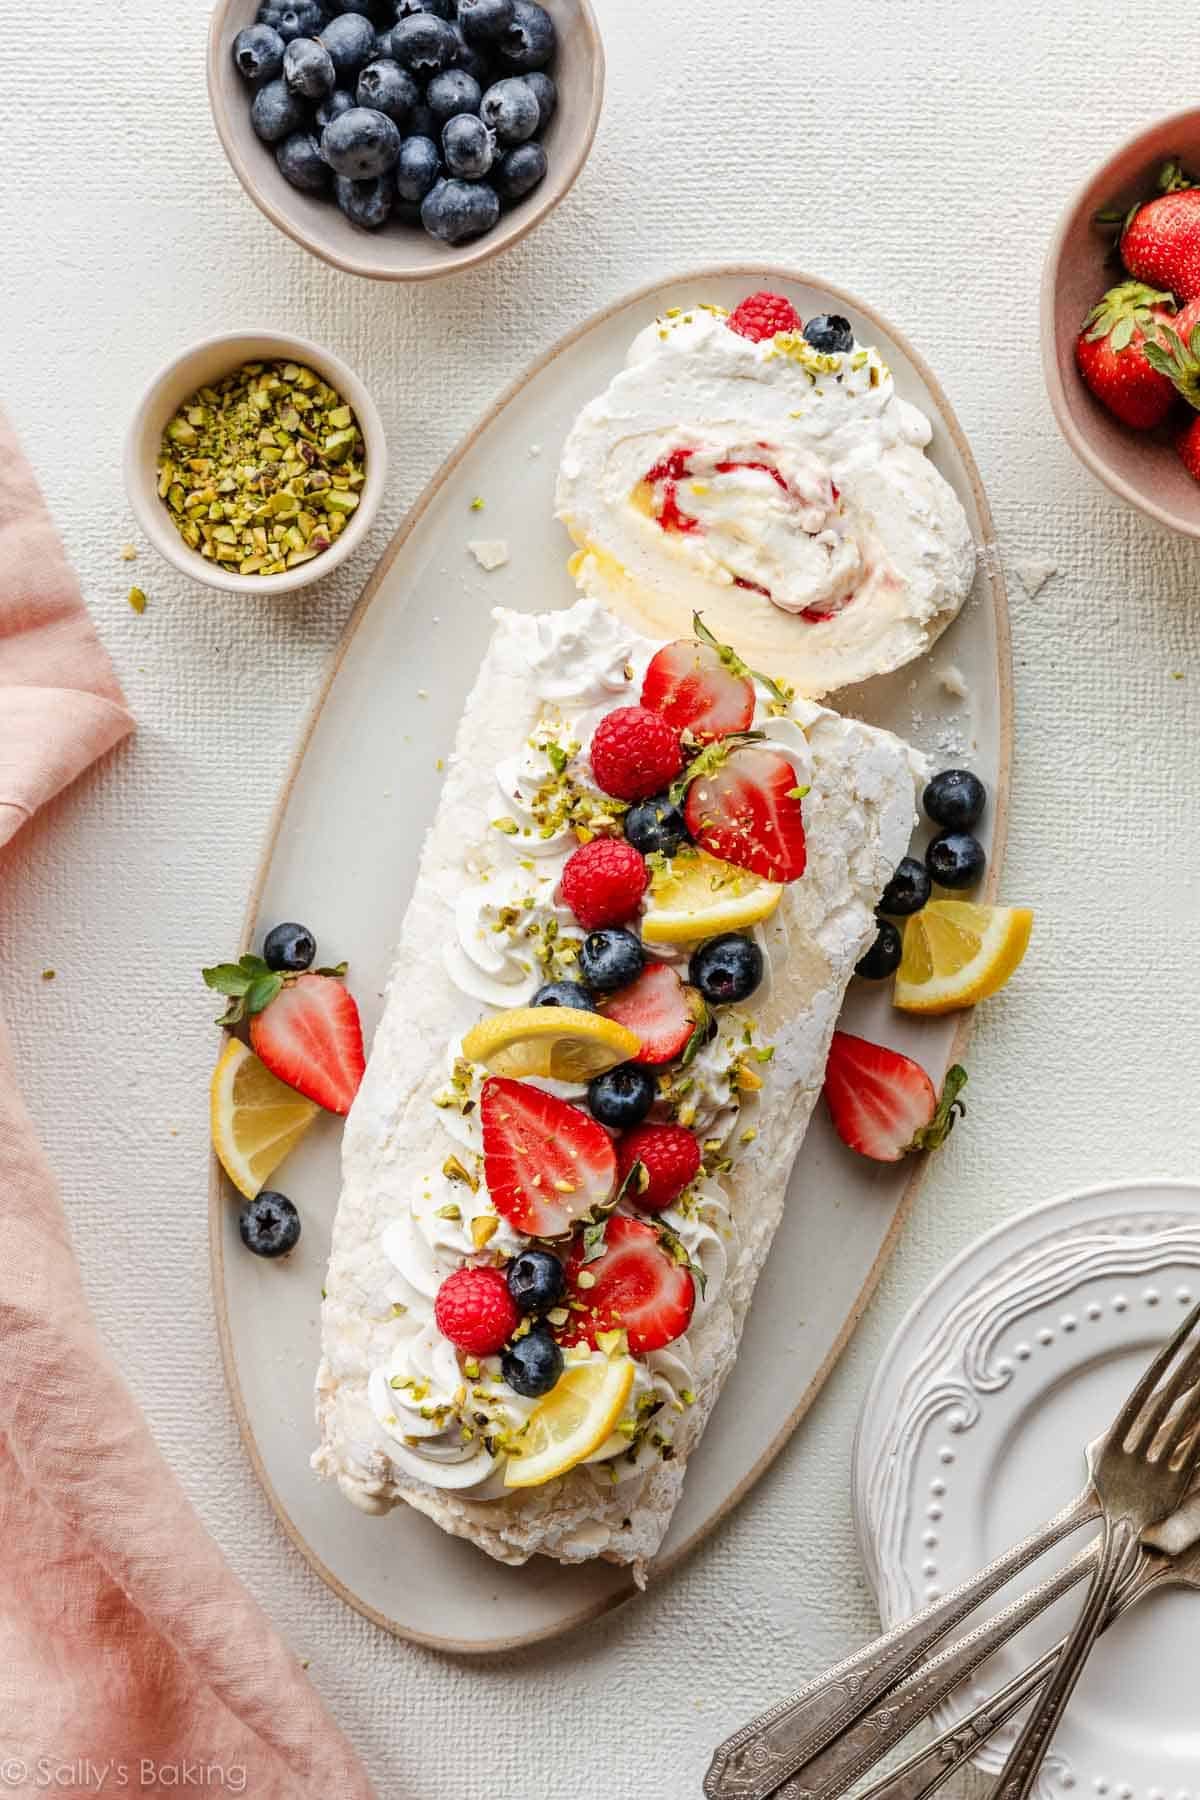
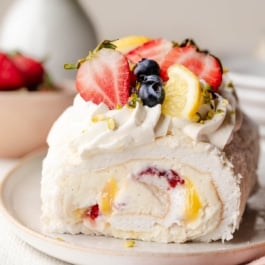
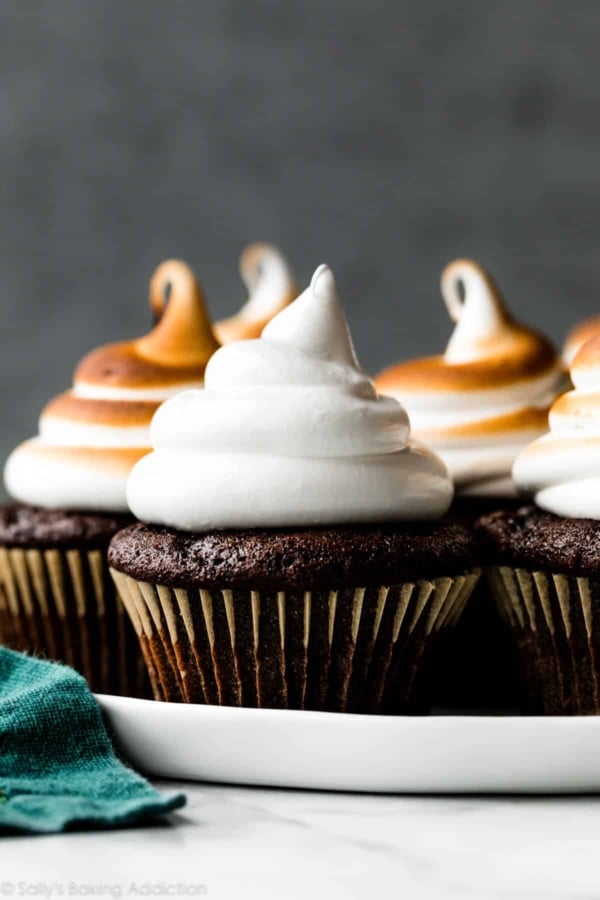
Variations & Customizations
Decorate your meringue roulade however you like!
Some garnish ideas:
- Piped dollops of whipped cream
- Fresh berries and sliced fruit
- A sprinkling of chopped pistachios
- Fresh mint sprigs or edible flowers
- Chocolate or white chocolate curls or shavings
- Sugared cranberries
For an alternate filling, you could try:
- The mascarpone cream from this fruit tart
- Homemade whipped cream
- Mocha whipped cream
- Pastry cream
- All lemon curd
I consider this meringue roulade an advanced baking recipe because it requires technical precision and asks you to pay attention to visual cues. The reward for your effort is something truly special, though: a dessert you will feel VERY proud to say you made from scratch.
Bragging rights!
And don’t stress too much about the aesthetics… those soft swirls and delicate cracks are part of its charm, and how the meringue roll looks is absolutely less important than how it tastes.
A few small cracks are totally normal! Large cracks usually mean it was either over-baked, cooled for too long before rolling, or rolled too tightly.
Humidity can affect meringue. Sugar attracts moisture from humid air, causing the meringue to become sticky and unstable. If you have issues with the meringue sticking too much to the parchment it baked on when you peel it off, check to make sure you sprinkled the parchment with granulated sugar before you spread the meringue in the lined pan.
It’s normal for meringue to weep (leak liquid) after a while (such as if you refrigerate the meringue roll overnight), but if you notice it happening right away, this could be due to under-beating or the sugar not fully dissolving, which results in an unstable structure that releases moisture. If the sugar is not fully dissolved, it breaks down and creates a syrup that leaks. Be sure to start with superfine sugar and whip until your meringue has stiff peaks.
This meringue roulade is best enjoyed right away, but, if necessary, you can assemble it a couple of hours in advance. Expect the meringue to soften over time, however, and the roll to sink and/or flatten out. You will have better results if you make both the meringue and cream filling ahead but wait to put them together/assemble the roll until just before serving. See the recipe Notes below for make-ahead instructions for the individual components.
You can use a larger baking sheet, such as a half sheet pan. Cut your parchment paper to approximately 11×16 inches in size, dot a little of the meringue on each of the four corners, then flip it over and press the parchment on the baking sheet to secure it in place. Spread the meringue evenly on the parchment, leaving about a 1-inch inch border all the way around.
Meringue Roulade
- Prep Time: 40 minutes
- Cook Time: 25 minutes
- Total Time: 2 hours, 30 minutes (includes cooling)
- Yield: serves 8-10
- Category: Dessert
- Method: Baking
- Cuisine: European
- Diet: Gluten-Free
Description
Light as air, delicately crisp on the outside, and soft and marshmallowy within, this homemade meringue roulade is a show-stopping dessert worthy of a special occasion. Start by making a billowy whipped meringue, bake it just until set, then roll it up with a lightly sweet vanilla cream filling and your favorite flavors of jam or curd (we love this with lemon curd and raspberry jam!). Read through the entire recipe before beginning, and avoid making this on very humid days, as moisture in the air can affect the meringue’s texture.
Ingredients
Meringue
- 5 egg whites, at room temperature (150g) (use the yolks for lemon curd!)*
- 1 cup (200g) granulated sugar, + 1 Tablespoon (12g) for sprinkling
- 1/2 teaspoon cream of tartar
- 1 and 1/2 teaspoons cornstarch
- 1 teaspoon vanilla bean paste or pure vanilla extract
- pinch of salt
- confectioners’ sugar, for dusting parchment
Cream Filling
- 1 cup (240g/ml) heavy cream, cold
- 1/3 cup (40g) confectioners’ sugar
- 1 teaspoon vanilla bean paste or pure vanilla extract
- 4 ounces (113g) full-fat block cream cheese, softened to room temperature
- optional: lemon curd and/or jam
Garnishes (Optional)
- 1/2 batch homemade whipped cream
- Fresh fruit such as berries and lemon slices
- Crushed pistachios
Instructions
- I recommend reading this recipe in full before beginning, including the recipe Notes below and the troubleshooting and FAQ above. This helps set you up for success!
- Make the meringue roll: Preheat the oven to 300°F (149°C).
- In a food processor, process 1 cup (200g) of sugar until superfine, about 10 seconds.

-
In a completely grease-free bowl, using a stand mixer fitted with a whisk attachment or a handheld mixer, whip the egg whites on medium-high speed until foamy and soft peaks form, about 2–3 minutes. Add in the cream of tartar. With the mixer running on medium-high, begin adding the superfine sugar, 1 Tablespoon at a time. Once all of the sugar has been added, turn the mixer up to high speed and continue beating until glossy stiff peaks form, about 3 minutes (or a little longer if using a handheld mixer). The peaks should be stiff enough that you can hold the whisk upright and the peaks won’t droop. Rub a small amount of the meringue between your fingers. If you feel any sugar granules, keep beating until smooth. If not, it’s ready for the remaining ingredients. Add the cornstarch, vanilla, and salt, and beat on low speed just until combined, about 10 seconds.

- Prepare the pan: Spread a little of the meringue in each of the corners of a 10×15-inch jelly roll pan (or any similar size) and then press the parchment paper into the pan, to help “glue” it into place. (This makes spreading much easier!) Lightly sprinkle about 1/2 Tablespoon of granulated sugar over the parchment.

- Spread the meringue in an even layer in the pan. An offset spatula is helpful here. Sprinkle the remaining 1/2 Tablespoon of granulated sugar evenly over the top. If you’re using a larger baking sheet, cut your parchment paper to 11×16 inches in size, and dot a little of the meringue on each of the four corners, then flip it over and press the parchment on the baking sheet to secure it in place. Spread the remaining meringue on the parchment, leaving about a 1-inch border all the way around.
- Bake for 25–30 mins. The meringue should look set and just barely golden on top, pull slightly away from the parchment edges, and if you touch it gently, feel crisp on top but springy under the surface.

- Remove the pan from the oven and set on a cooling rack. Let the meringue cool for just 10 minutes. If it cools for too long in this step, it’s much more likely to crack. It will deflate a bit as it cools.
- Prepare to roll: As the meringue cools, place a piece of parchment paper (larger than 10×15 inches) on top of a clean tea towel flat on the counter. Align one of the short edges of the parchment close to one end of the towel. Using a fine mesh sieve, dust the parchment with about 1 Tablespoon of confectioners’ sugar. After 10 minutes of cooling in step 8, invert the meringue onto the parchment. Carefully peel off the parchment paper that was on the bottom of the meringue as it baked. Dust a little more confectioners’ sugar on top, then cover with a new piece of parchment. Starting with the short end aligned with the end of the towel, gently roll the meringue up with the parchment and the towel. Do this slowly but steadily, and avoid rolling it too tightly. Allow the meringue to cool at room temperature rolled up in the parchment/towel, about 45 minutes to 1 hour. Feel free to set it aside at room temperature for up to 1 day.

- Make the cream filling: Using a handheld or stand mixer fitted with a whisk attachment, whip the heavy cream, confectioners’ sugar, and vanilla on medium-high speed until soft peaks form, about 2–3 minutes. Transfer the whipped cream to another bowl. Place the softened cream cheese in the mixer bowl (no need to clean it first) and beat with the whisk attachment on medium-high speed until completely smooth.
- Add the whipped cream back into the bowl with the cream cheese. Mix on medium-low speed until just combined. Use right away (next step), or cover and refrigerate the filling for up to 3 days before using.
- Once the meringue roll has cooled, gently unroll, and discard the top piece of parchment. Spread the cream filling evenly over the top. Spoon dollops of curd and/or jam on top, if using. Gently re-roll the meringue with the filling. If it’s helpful, lift up the bottom piece of parchment underneath the meringue to help ease the roll over onto itself. Transfer the meringue roll to a serving plate. Garnish as desired. I used a half batch of whipped cream piped with Wilton 1M piping tip, crushed pistachios, and lots of fresh fruit.

- Serve immediately or refrigerate for up to 2 hours. Expect the meringue to weep or deflate slightly in the refrigerator the longer it sits. A large serrated knife works best for slicing.
- Cover and store leftover meringue roulade in the refrigerator for up to 2 days. The meringue will soften over time, and may weep some liquid, but that shouldn’t affect the taste.

Notes
- Make-Ahead Instructions: Meringue roulade is best enjoyed the day it’s made. The meringue will soften and weep droplets of moisture over time. You can make the meringue (through step 9) a day in advance, and let it sit at room temperature, rolled up in the towel. You can make the cream filling up to 3 days in advance and store it, tightly covered, in the refrigerator until ready to use.
- Special Tools (affiliate links): Egg Separator | Food Processor or Blender | Electric Mixer (Handheld or Stand) | 10×15-inch Pan | Parchment Paper | Small Offset Spatula | Fine Mesh Sieve
- Egg Whites: Eggs separate easier when cold, but room-temperature egg whites whip faster and into greater volume than cold egg whites. So separate your eggs while cold, then allow the egg whites to come to room temperature before beginning. Use some of the yolks to make lemon curd!
- Sugar: You need superfine or caster sugar so it dissolves fully in the egg whites. To avoid tasting sugar granules, pulse 1 cup granulated sugar in a food processor. You now have superfine sugar to use in the recipe.
- Acid: Instead of the 1/2 teaspoon of cream of tartar, you can substitute 1 teaspoon of white vinegar, apple cider vinegar, or lemon juice.
- Gluten Free: This recipe is naturally gluten free. However, some brands of cornstarch may be processed on shared equipment with wheat, so if needed, check for a labeled gluten free cornstarch.


Reader Comments and Reviews
This was really delicious! Lemon curd was the perfect addition to the cream inside. Definitely takes a bit of finesse, so my finished project turned out messy. But practice makes perfect! Will definitely be making this again!
I was a little nervous to make this recipe since I have never made a baked meringue before. It blew me away! I did add the lemon curd and did a raspberry jam with the filling. The lemon added a good tartness to offset the sweetness of the meringue and cream.
Sure, my meringue cracked a bit and I likely added too much lemon curd and raspberry jam to the filling. But when I tell you this recipe was absolutely heaven in dessert form, I am not exaggerating. So light, so flavourful. Simply divine.
I am semi famous for my pumpkin rolls so I figured I could do this roulade with ease. It wasn’t as easy to get it to fluff like Sally’s though. It rolled just fine and tastes fabulous! I will definitely bring it to summer parties!
I made the roulade for the challenge and served it for Easter. It actually came out really good, I followed the directions exactly and only had one small crack in the meringue but I was able to roll it inside. My biggest issue was that the filling was a little lumpy but that was my fault for using the cream cheese too cold. Overall, I was very happy with my results and everyone really enjoyed it!
I made the blueberry pie bars as the alternate recipe for the baking challenge. The recipe was simple to follow and they turned out well
One of the best Pavlovas I have ever made. It was delicious, beautiful and will definitely be on repeat in my house.. followed your instructions and it turned out perfect
It took me a couple of tries (left out a crucial step so the meringue didn’t easily let go of the parchment after baking) but the second time around everything went well and it brought rave reviews from everyone who tried it! Sally’s steps were spot on and so easy to follow. Looking forward to making this again!
This roulade recipe is super easy to follow. Mine turned out a little flat but still tasted delicious. I made a lemon curd for the flavor along with adding a strawberry preserves.
Nice light dessert that’s not overly sweet!
Stunning! Made this for Easter and everyone loved it! Such a light dessert. Instructions were easy to follow
Best dessert!! Already making plans to make this again.
Delicous! Fancy!
Mine was very cracked and falling apart when I unrolled it but as I put the fillings on and rolled it back up, it all came together very beautifully.
Recipe requires effort but not hard.
I was so excited to make this for Easter! As instructed, I read all the way to the end and followed the directions exactly. It was SO good and such a beautiful dessert. It was light and lovely. I also make the lemon curd as suggested and those were our favorite bites!
Delicious! I followed the recipe exactly and the lemon curd is amazing! First time making meringue, rolling was a new trick to me. Turned out pretty good for my first time.
Beautiful dessert. Looks and tastes amazing!
The whole idea of this dessert was a little intimidating, but it was simple enough because of all of the great hints and suggestions Sally provided. I absolutely agree that you should read through everything ahead of time and follow all of the tips for timing and rolling. It was so delicious and while not as prettily decorated as the one in Sally’s photos, it did not crack or fall apart at all. My guests were all impressed, I will definitely make this again!
This was very tasty. A little sweet for me so I think I would only make it for special occasions. Mine did crack quite a bit, but was easily patched together with the cream.
This was super yummy! I made it for Easter and my family loved it. It did crack a lot when I initially unrolled the meringue, but the filling helped keep it together. It wasn’t the prettiest looking roll, but it was super delicious.
Great recipe, I made it for Easter. I was a bit worried because it was raining outside but it came out perfectly. I set a ten minute timer after taking it out of the oven and then rolled it. When I unrolled it I noticed a crack right at the end part but once I lathered the whipped cream mixture over it everything stuck together and I rolled it without issue. I put a little too much lemon cured towards the end so that oozed a little. Next time I will leave a barrier. The taste was amazing, like marshmallows with a slight crunch.
This is a slightly challenging yet rewarding recipe! Definitely something different that will surprise guests and so customizable as well! Some skill is involved but Sally’s instructions are so helpful and specific, its hard to go wrong!
Amazing recipe-clear, simple and the result is spectacular! I’ve done it yesterday and it came out great!
Really enjoyed the technical challenge of making this. I will be making this again for family! It tasted delicious and super light and airy! While this is a complicated recipe the instructions were very clear and easy to follow!
This was my first time making anything like this and while the swirl didn’t turn out just right, the instructions were easy to follow and it still turned out delicious. I would try this again and experiment with different flavors for the filling. I did lemon curd and raspberry as suggested and it was amazing! This light and refreshing dessert is perfect for summer. I’m excited to have a new unique dessert I can make.
This was tricky but so very worth it. My family loved it! And have already made me promise to make it again, including the neices.
We’re so happy to read this, Kylie! Thank you for giving it a try!
To all the Europeans making this: you can fill an entire standard baking sheet of 30x40cm with it.
Loved this, made it with lemon curd and fresh strawberries. You need something tart to cut the sweetness of the roulade.
Forgot the second bit of parchment when rolling the meringue so had a few cracks, but overall great recipe! Did passionfruit curd inside and raspberries on top which was a winning combo.
The Meringue roulade was quite light and looks so pretty! I definitely could have added more fruit filling. The family enjoyed the Easter treat this year!
I never thought I could make such an elegant dessert. It was time consuming, but soooo worth it. It looked good and tasted great! Made my own lemon curd too! Next time I will try a mocha filling. Thanks for another great recipe and making me go out of my comfort zone!!
While my meringue cracked into a few pieces when rolling, it still turned out somewhat presentable and delicious, which is the most important part. I think I probably baked it slightly too long, as I was waiting to feel the crisp top. Next time I wouldn’t wait for that. I also made the homemade lemon curd linked in the recipe. I highly recommend it. I did struggle getting the cream cheese to fully incorporate with the whipped topping with my stand mixer whisk, I would probably use a handheld mixer for this step next time.
I did make the meringue and the whipped topping the night before and assembled it before serving, so I can attest that the make ahead instructions work well! I will definitely be making this recipe again. It wasn’t as hard as I was expecting with all of the tips and tricks provided!